Setting Up Virtual Motion Capture for Dance Dash in OBS Studio
Some benefits that come with using VMC: – Smoother FBT that better resembles your actual body movement – Easier calibration process – Being able to use facial expressions set for your avatar *Note: Make sure you have a usable avatar in .vrm format
Software version & equipment used for testing: – Virtual Motion Capture v0.56f6 (most updated version as of Nov 2023) – LIV v2.12.3 – OBS 29.1.3 – Valve Index – 3x VIVE Tracker 3.0
Setting up Virtual Motion Capture (VMC)
1. Download VMC from: https://booth.pm/en/items/999760 – Go through with the normal installation process and launch the .exe file. → This should pop up two windows: “Control Panel” and “VirtualMotionCapture”.
Installing/Enable VMT
2. From the “Setting” button in the Control Panel, locate the Virtual Motion Tracker (VMT) section and click install.
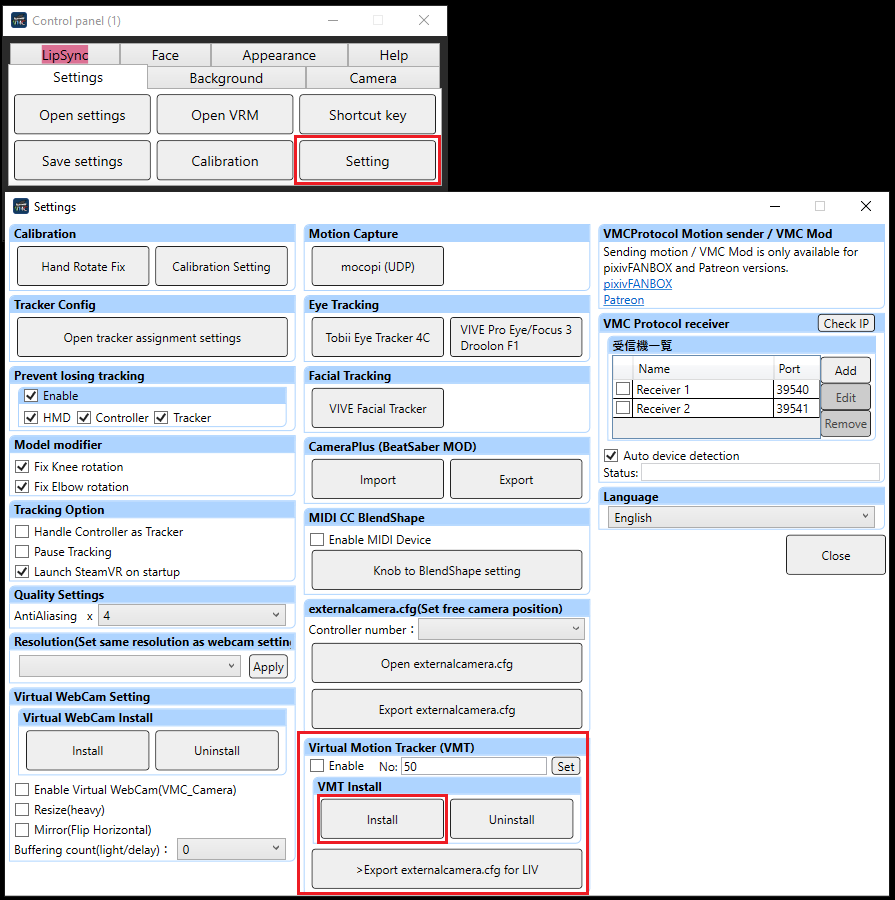 → You will get 2 popups total during this step. First one confirming that you'd like to continue installing VMT (which will restart your Steam VR), and another informing you of your success. Press OK on both.
If you happened to have VMT installed already, cancel out and skip this step.
→ You will get 2 popups total during this step. First one confirming that you'd like to continue installing VMT (which will restart your Steam VR), and another informing you of your success. Press OK on both.
If you happened to have VMT installed already, cancel out and skip this step.
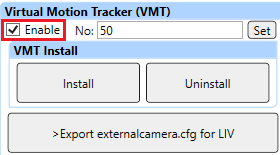
3. Ensure you have VMT enabled by clicking on the box
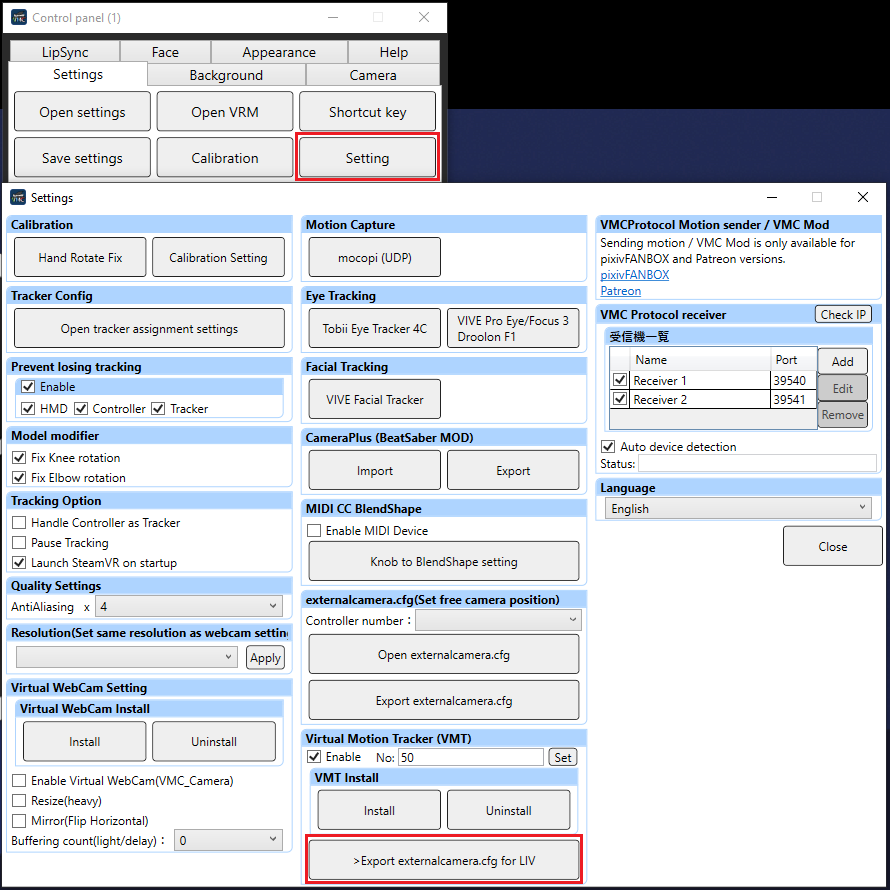
4. Export external camera configurations to be able to put it together with LIV (later).
From “Settings”, click on “>Export externalcamera.cfg for LIV” under the VMT section, and save.
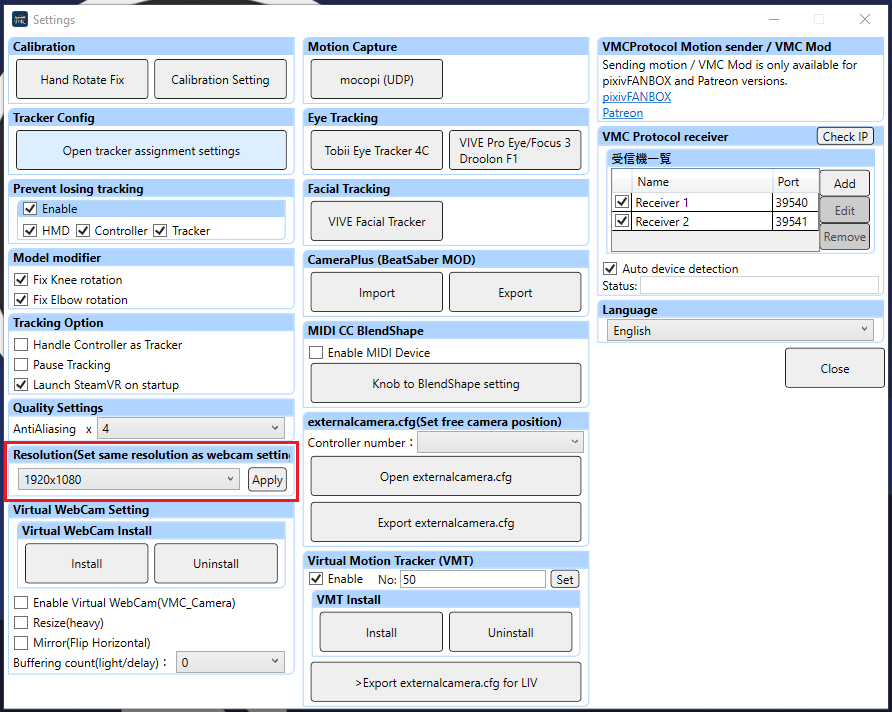
5. Set your VMC resolution.
Under “Settings”, find the “Resolution” section and set this to your liking. (For reference, I am using 1920x1080 for my own streams, but use what works for you.)
 *Once you're done with the VMT section, close out of the settings menu.
Importing Your Avatar
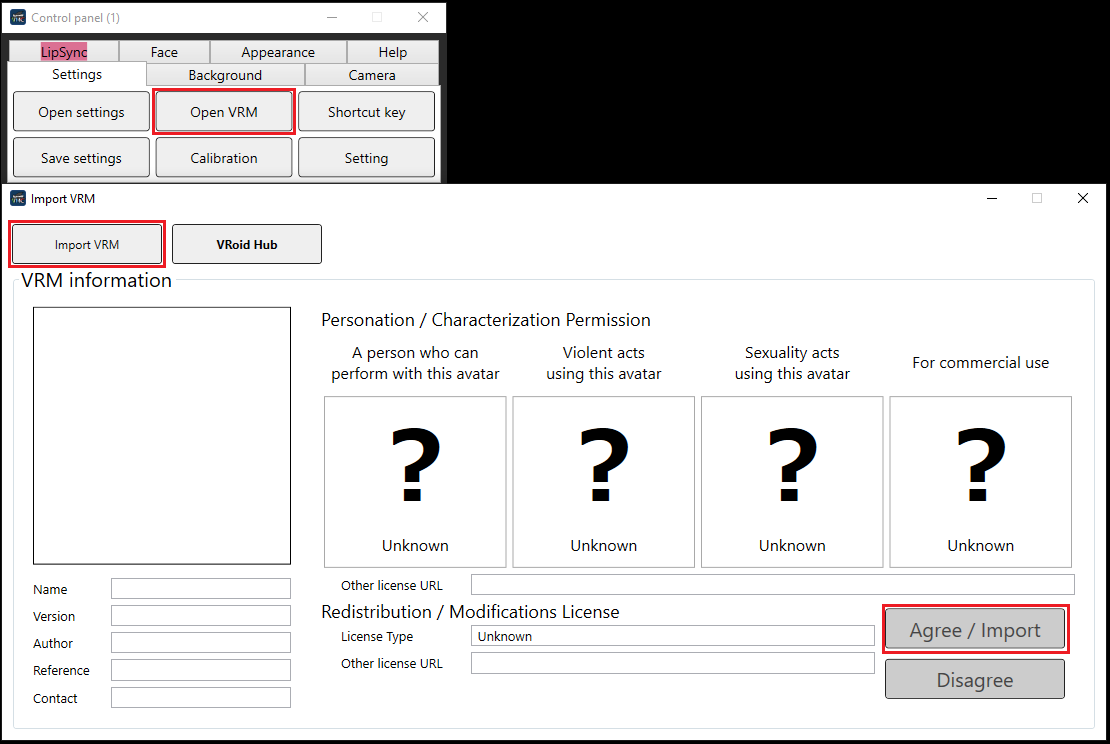
6. From the Control Panel, click the “Open VRM” button and then click “Import VRM” in the upper left corner to select your .vrm file you'd like to use. Click “Agree/Import” in the bottom right.
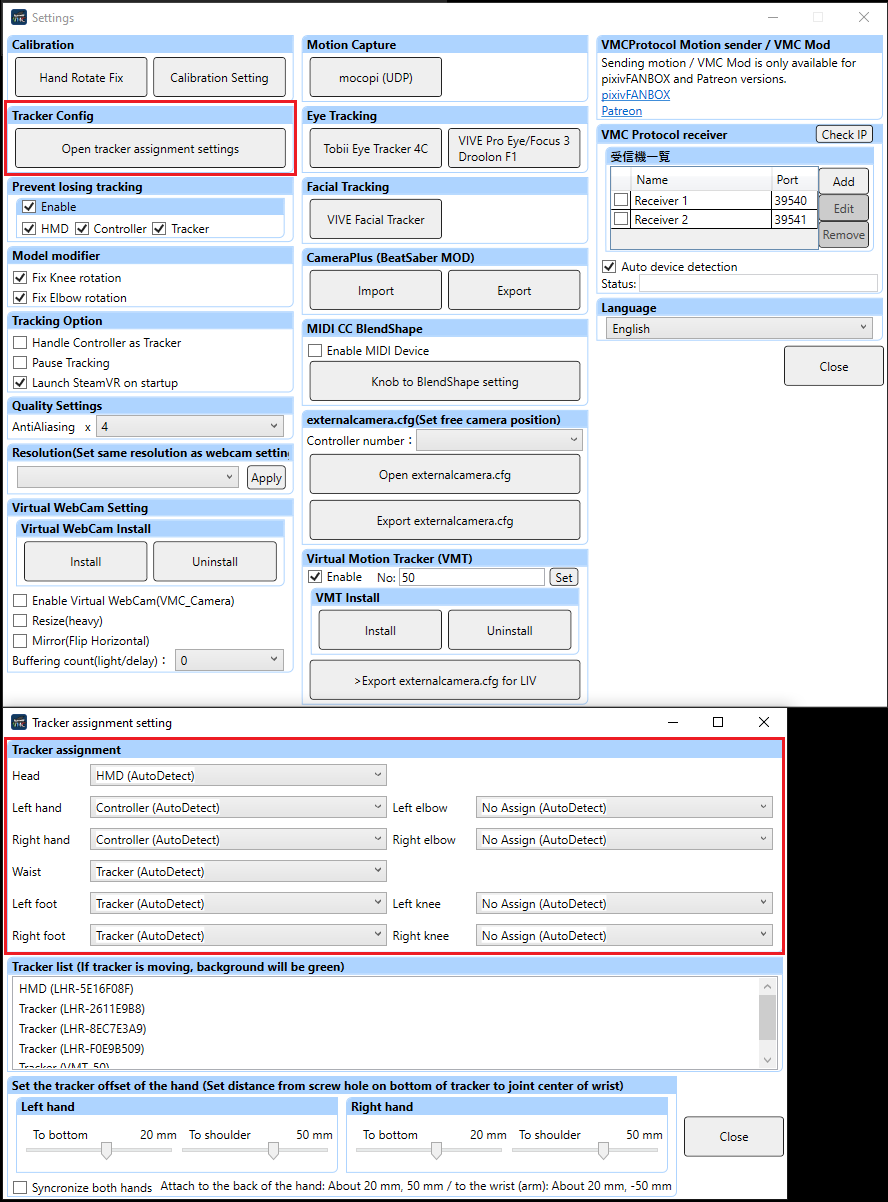
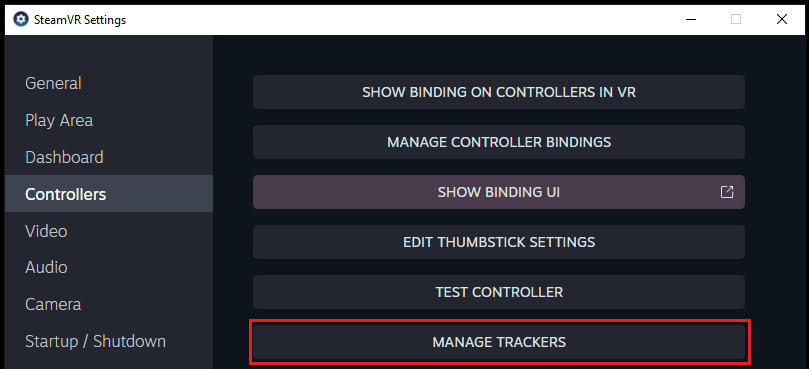
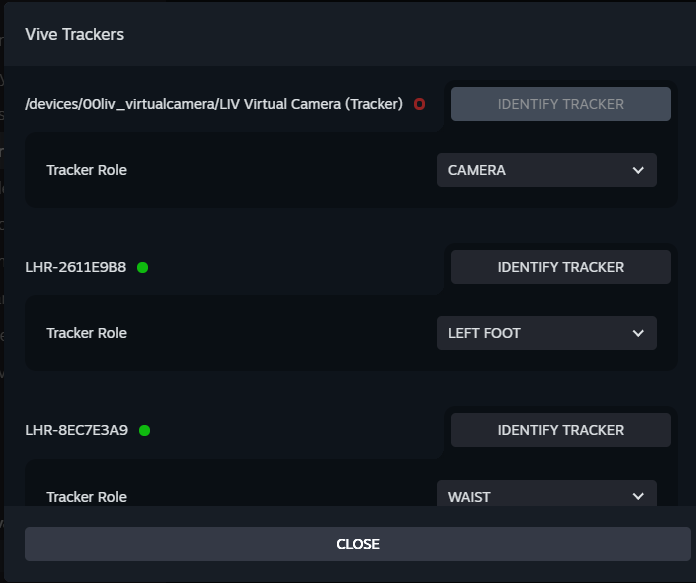
 → VMC does a pretty good job auto-detecting trackers and assigning to your respective body part. If auto-detection fails you, select “Open tracker assignment settings” from your Control Panel menu and make sure that the tracker assignment matches that of what is reflected in your Steam VR settings.
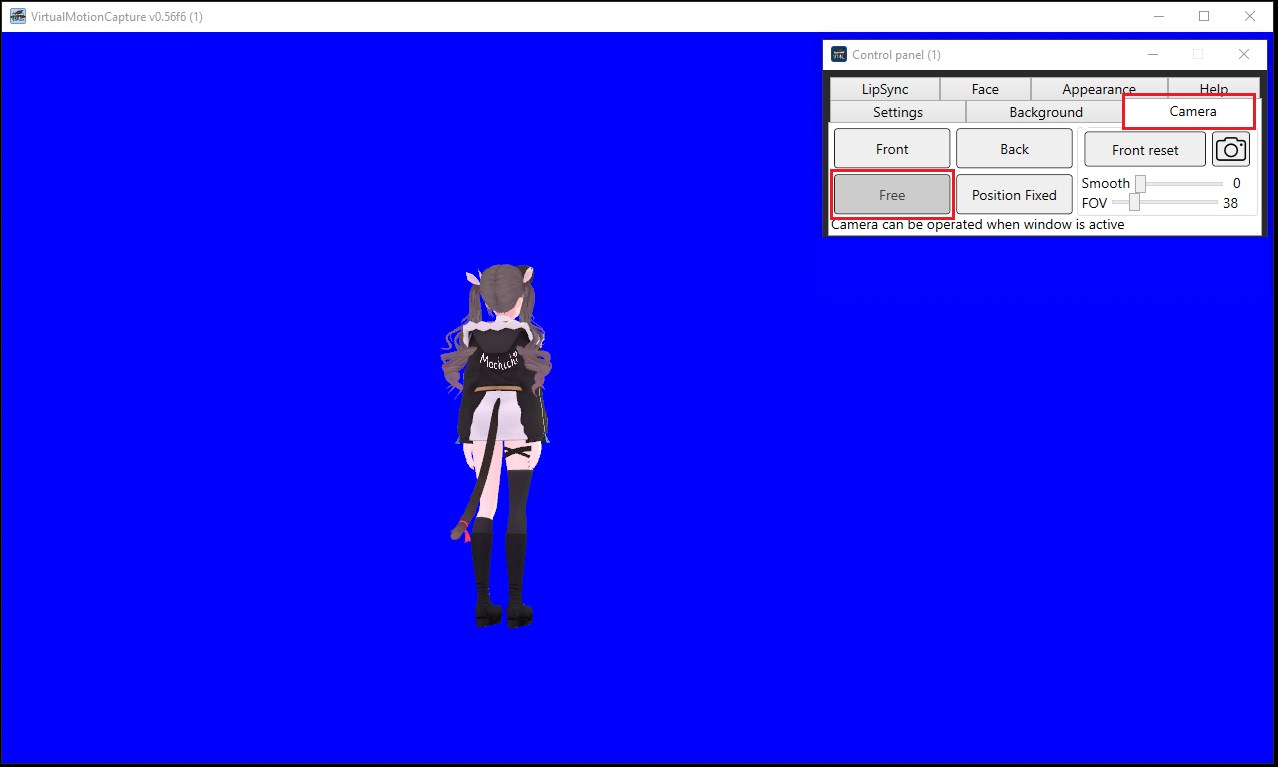
Setting Up Your Camera Angle 7. From the “Camera” tab in the Control Panel, select “Free”.
You will need to use your imagination a little to get an idea of what VMC overlayed with your game would look like, but I would personally suggest going for a slight “off-angle” from behind. Though you will be able to make camera angle changes later on, it's best to get it as close as possible at this step as we will be saving these settings which will be what loads every time when you launch VMC with your Dance Dash configurations.
You can adjust your camera angle to your liking from the window displaying your avatar with the controls below: – Scroll to zoom in/out – (Hold) Right click to rotate – (Hold) Click scroll wheel to move
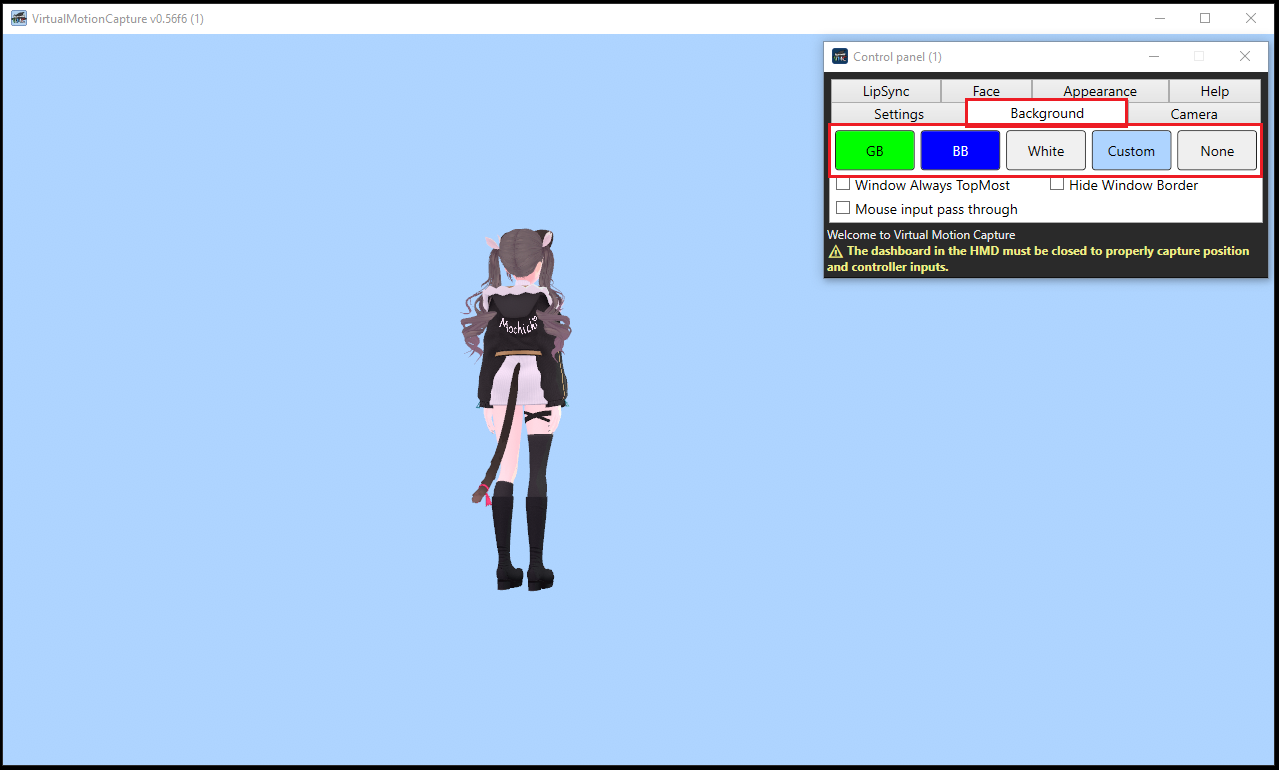
8. Choose your background color.
The “Background” tab from your Control Panel will allow you to choose what color you'd like to use to key-out the background when putting it together with the game. Default GB, BB, or Custom should work for most avatars. Choose the one that works best with your avatar.
 Note: There are many other cool features that VMC will allow you to do (e.g. facial expressions, lip sync... etc.) but I will not be going over this part for the sake of my own sanity and keeping this tutorial focused on setting up VMC + Dance Dash. “Shortcut key” tab is where you will be able to find your expression settings, and the rest should fairly be self explanatory with the tab names.
Saving Your Settings
9. From the “Settings” tab → “Save settings” to save all of your progress from the steps above. If you make multiple configurations, you will be able to select which setting you use from the “Open settings” button.
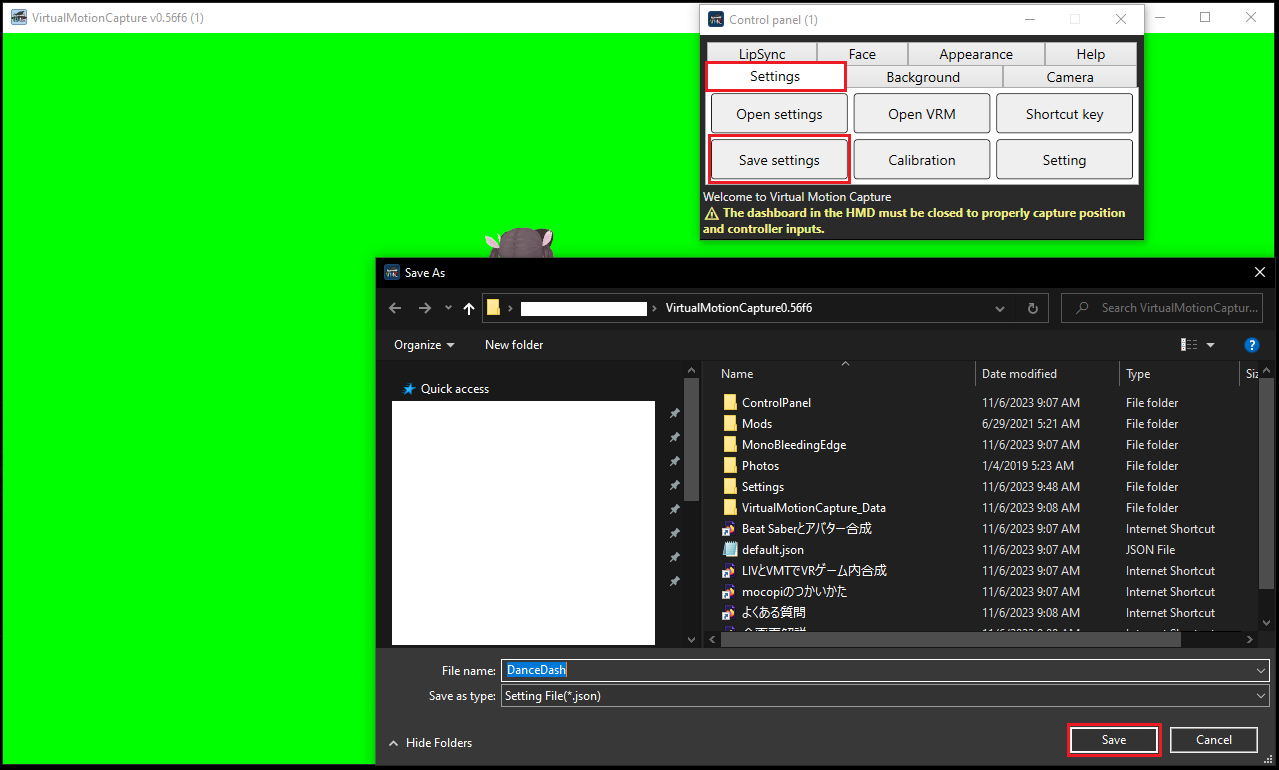 Congratulations. You're done setting up VMC.
OBS Virtual Camera
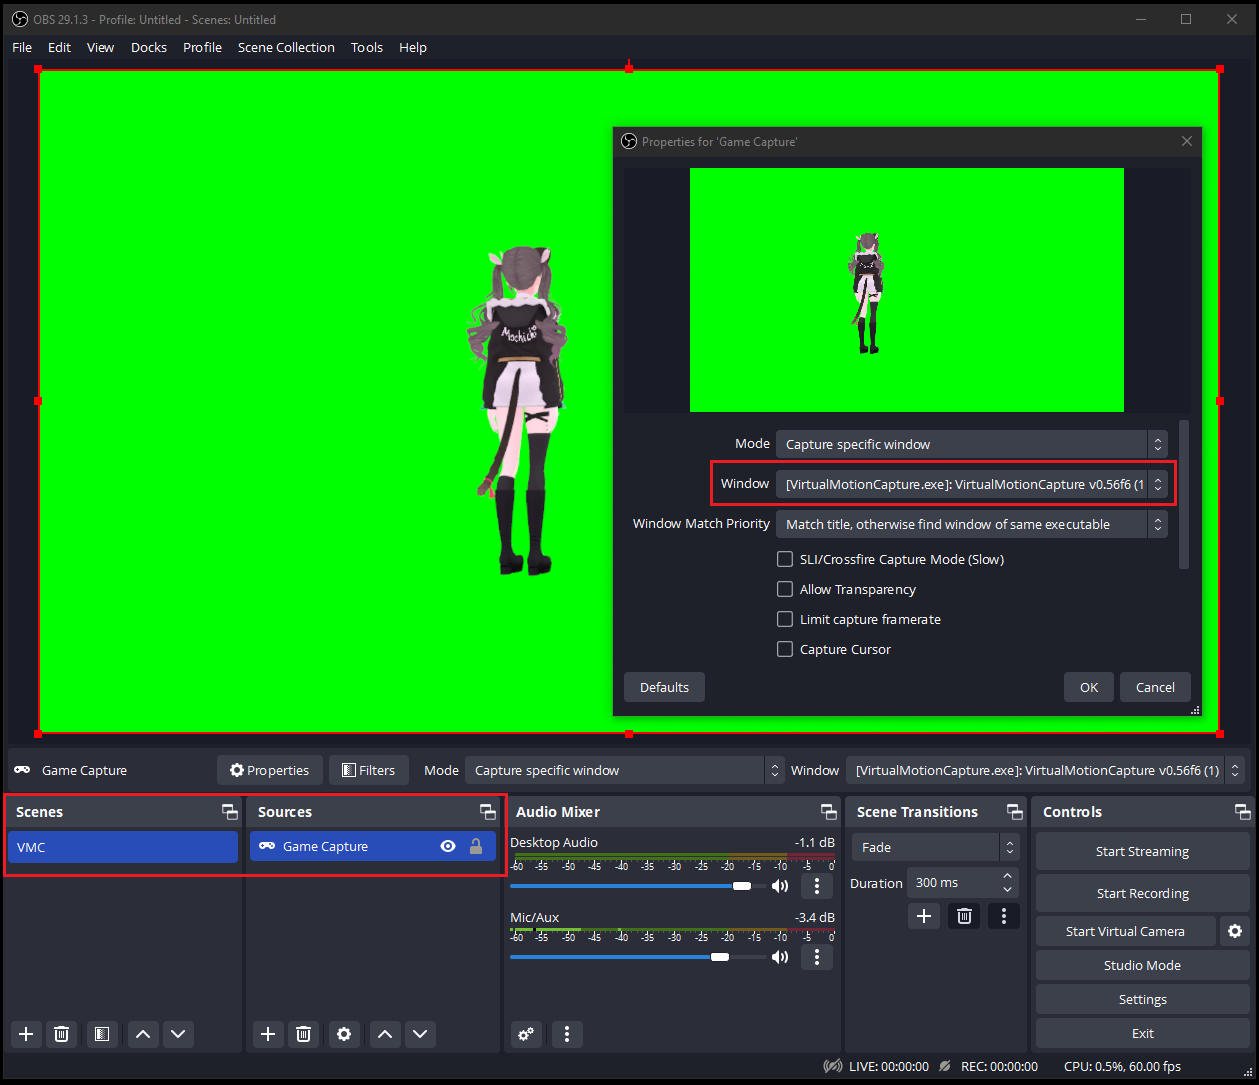
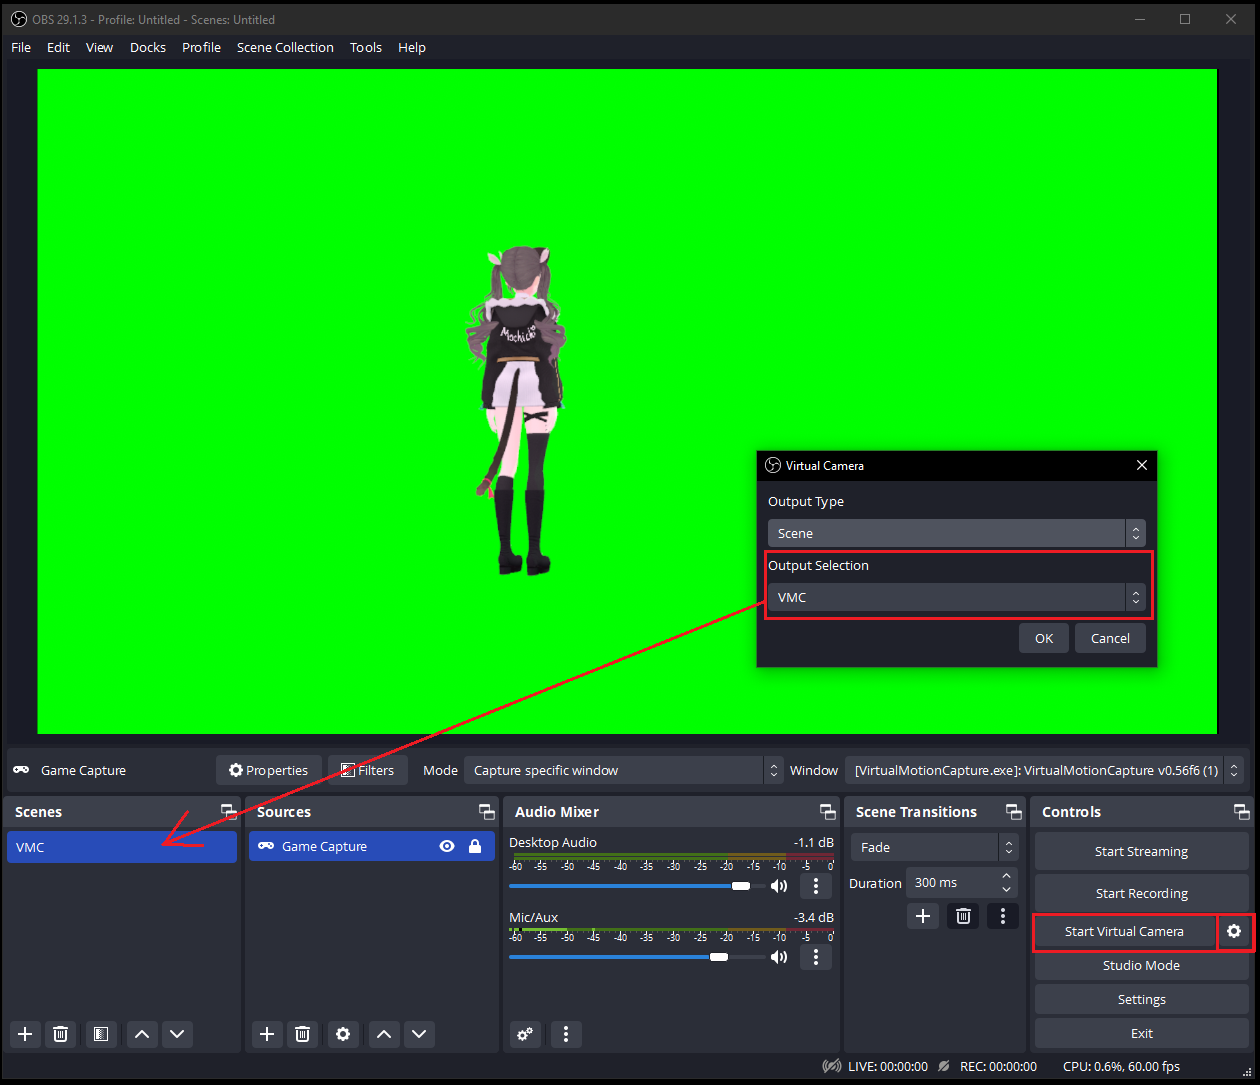
10. In OBS Studio, create a new scene for the purpose of using OBS's virtual camera feature.
In the new scene, create a new “Game Capture” source and capture the VMC window with your avatar displayed. (Adjust the capture to fit the screen if needed).
11. Set up your OBS virtual camera.
On the bottom right, click the gear icon next to “Start Virtual Camera”.
Select “Scene” for Output Type.
Select the scene you created in the previous step for the virtual camera.
LIV Installation/Setup
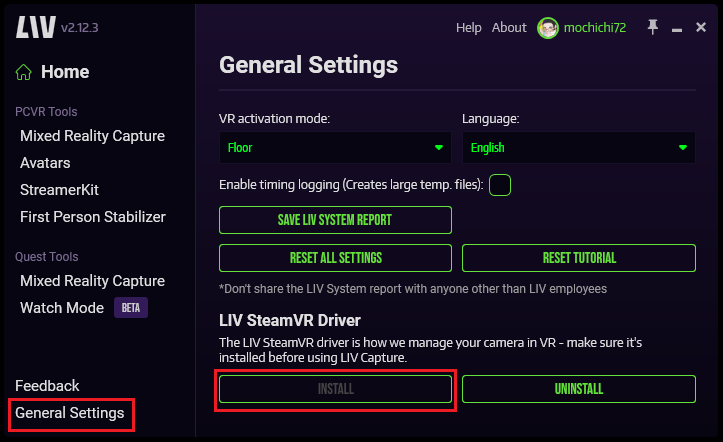
12. Install and launch LIV through Steam from: https://store.steampowered.com/app/755540/LIV/
If it's not installed already, install the “LIV SteamVR Driver” from the General Settings tab in the main LIV window.
LIV Camera Output Setup
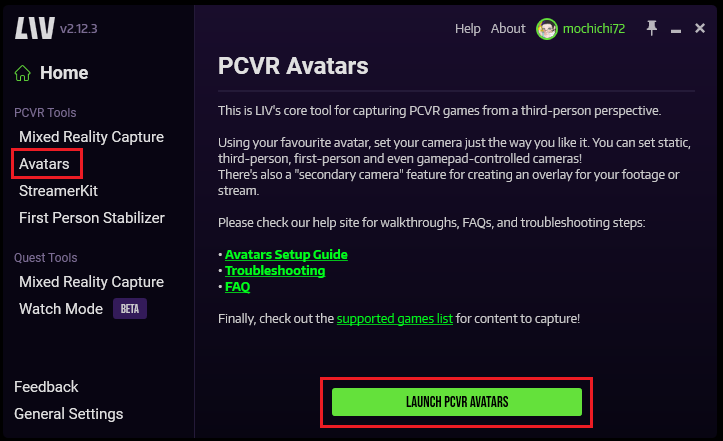
13. From the “Avatars” tab, click on “Launch PCVR Avatars”
→ This will launch the LIV Output and allow you to go into the settings for the output.
14. Add new camera in LIV
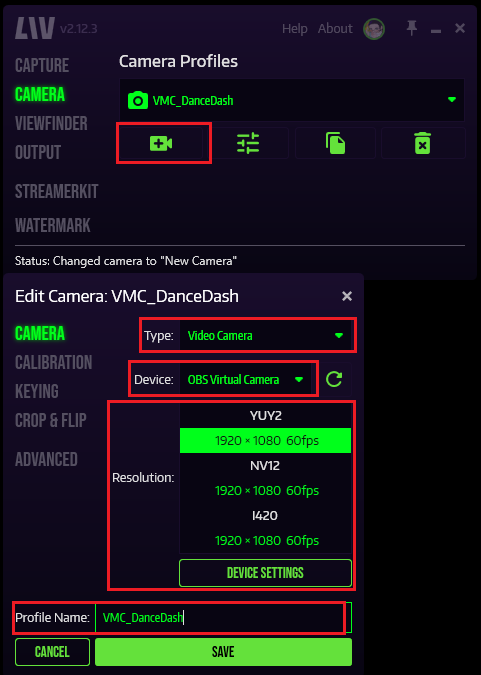
From the “Camera” tab, add a camera, and set as:
– Type: Video Camera
– Device: OBS Virtual Camera
– Resolution: What you selected as your resolution for VMC in Step 5
– Profile name: to your liking
Don't forget to save.
15. Import your VMC external config into LIV.
From the “Calibration” tab, ensure “Details” in the top right has been checked off.
Click “Import”, select “From file”, and select the file you exported from VMC in Step 4.
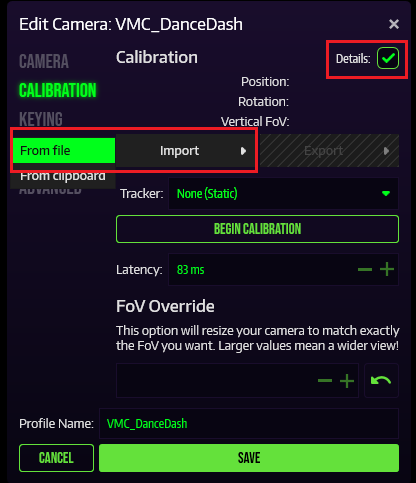 → You should get a popup telling you that the .cfg file was successfully imported.
16. Set tracker settings for LIV.
From the “Tracker” dropdown, select the option that has “VMT_50”.
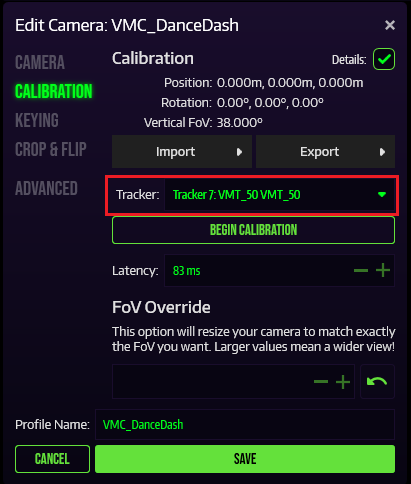 Click Save.
17. Set up chroma key settings.
From the “Keying” tab, ensure the “Chroma Key” setting has been turned on.
Click on “Pick Color”, and use the color picker tool (dropper icon) to match the color you picked for your VMC background color.
You can also use the “Threshold”, “Smoothness”, and “De-spill Strength” settings to cleanup the keying.
Click Save.
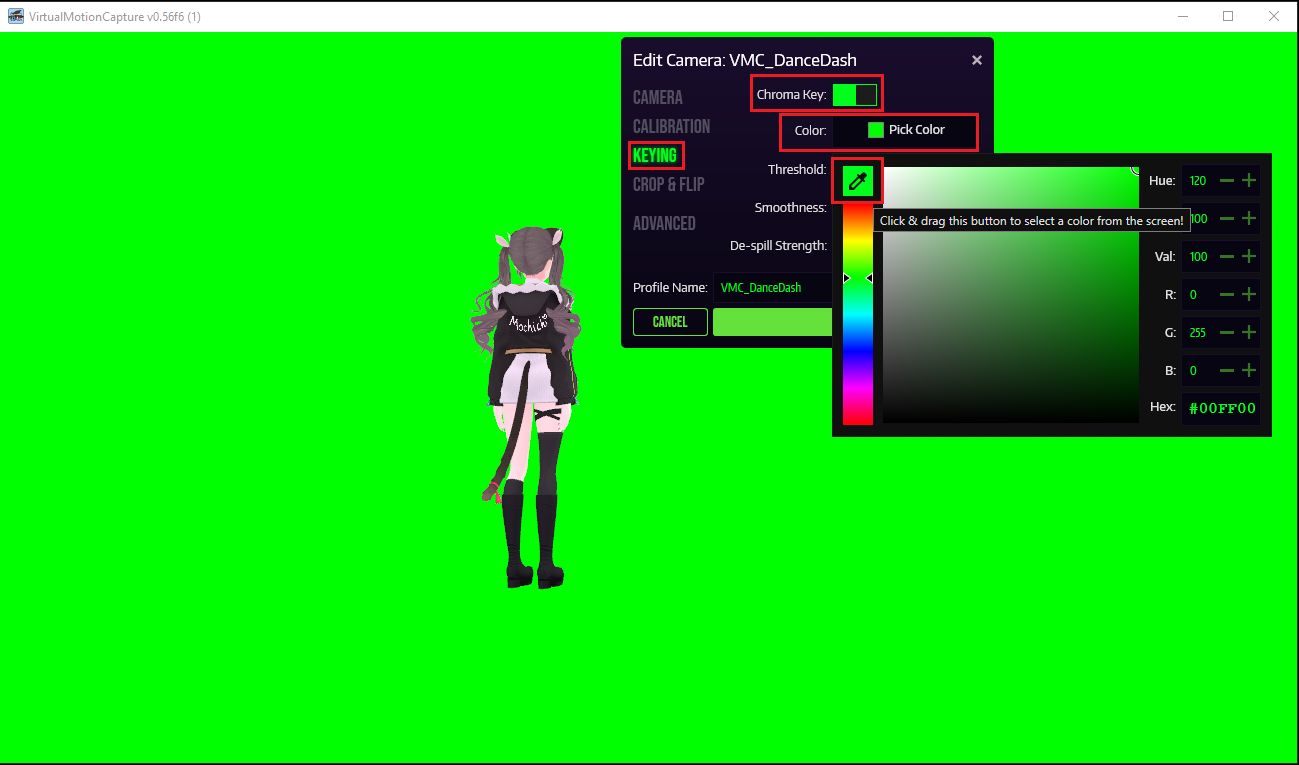
If set up correctly, your LIV Output should now be showing your avatar as it shows in VMC but with a black background.
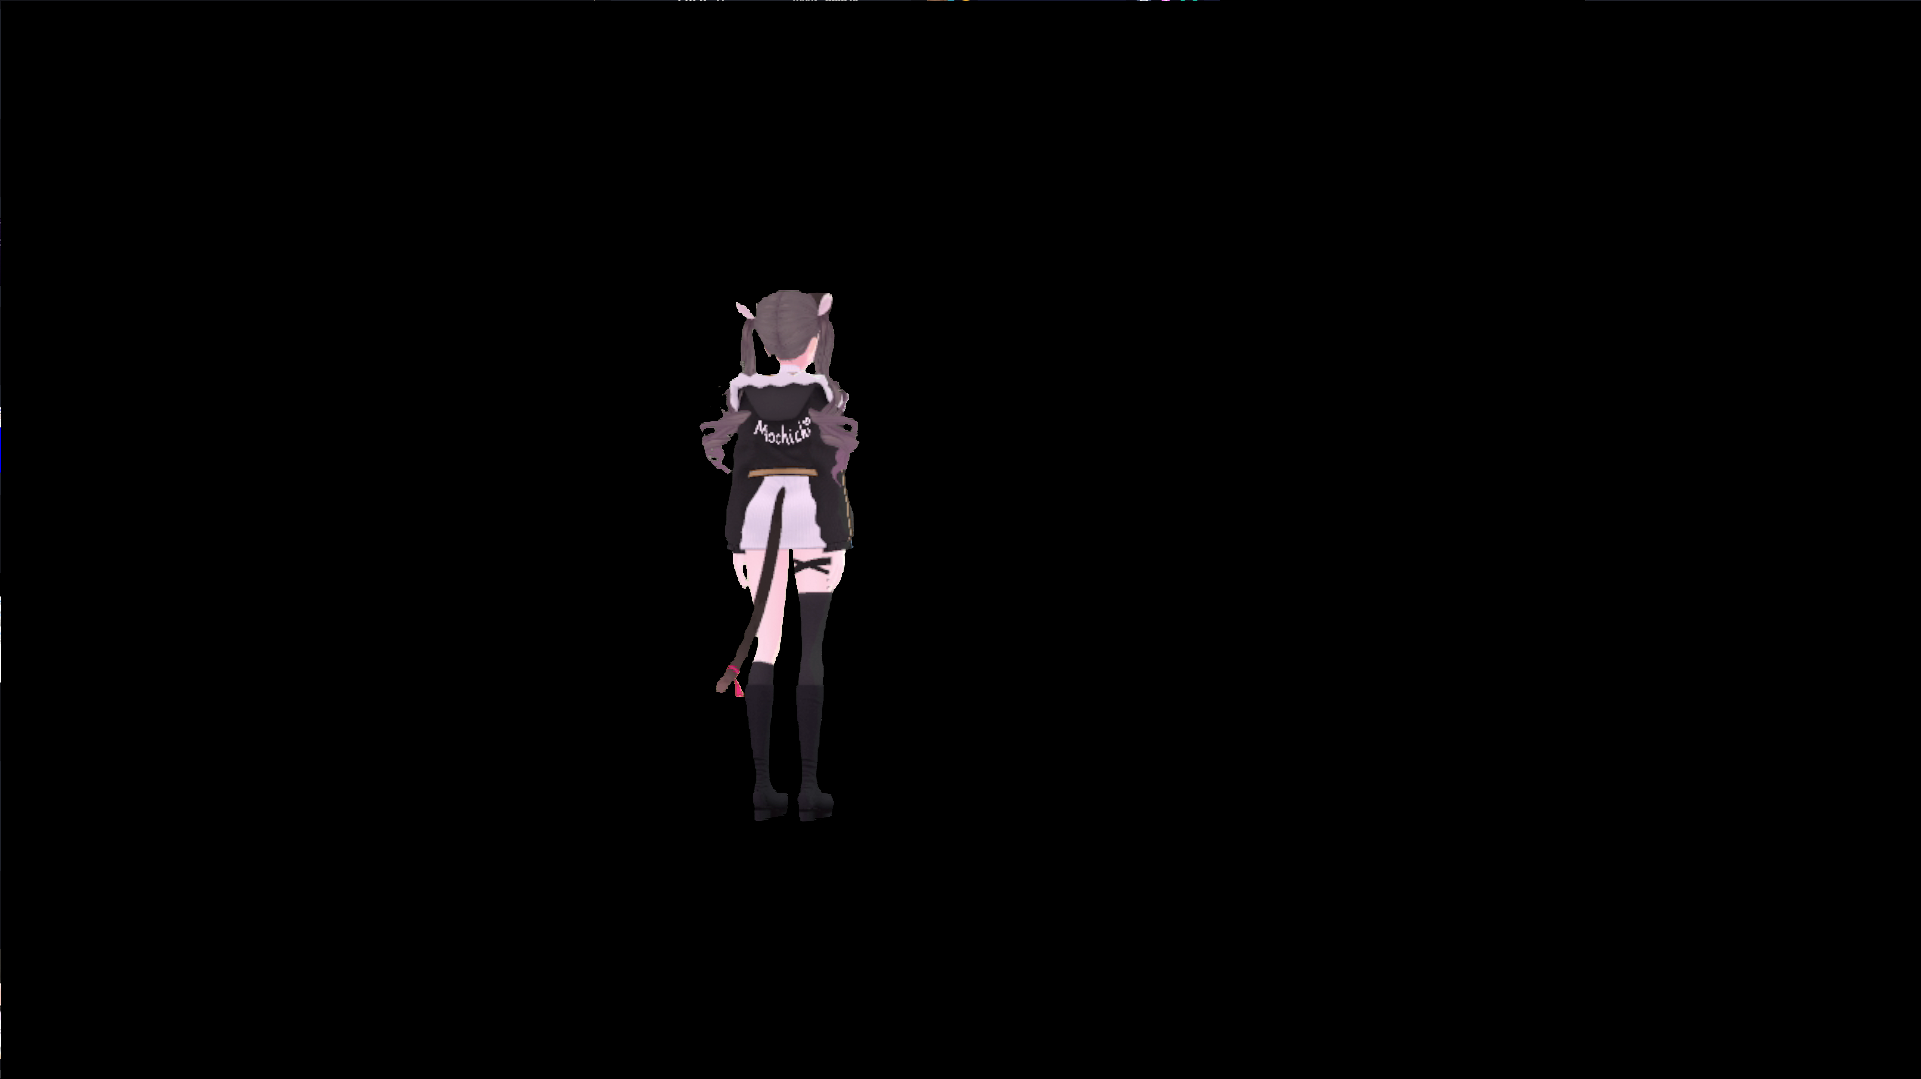
18. Set up LIV final output.
From the “Output” tab, select:
– Resolution: What you selected as your resolution for VMC in Step 5
– FPS: To your liking, 60 is a good starting point.
– Monitor: Select your monitor of choice
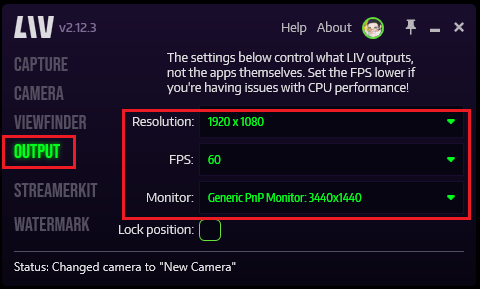 *“Lock Position” is optional. I like to keep it checked off because I am constantly moving things around on my monitor but you can keep it checked on if you would like to always have your LIV Output in one spot.
Launching the Game and Putting Everything together!
19. Launch Dance Dash through LIV.
From the “Capture” tab, select “Dance Dash” from the dropdown and click “Sync & Launch”.
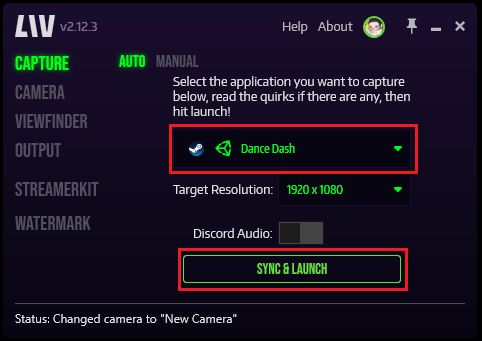 This should change the LIV Output to now show your avatar in game!
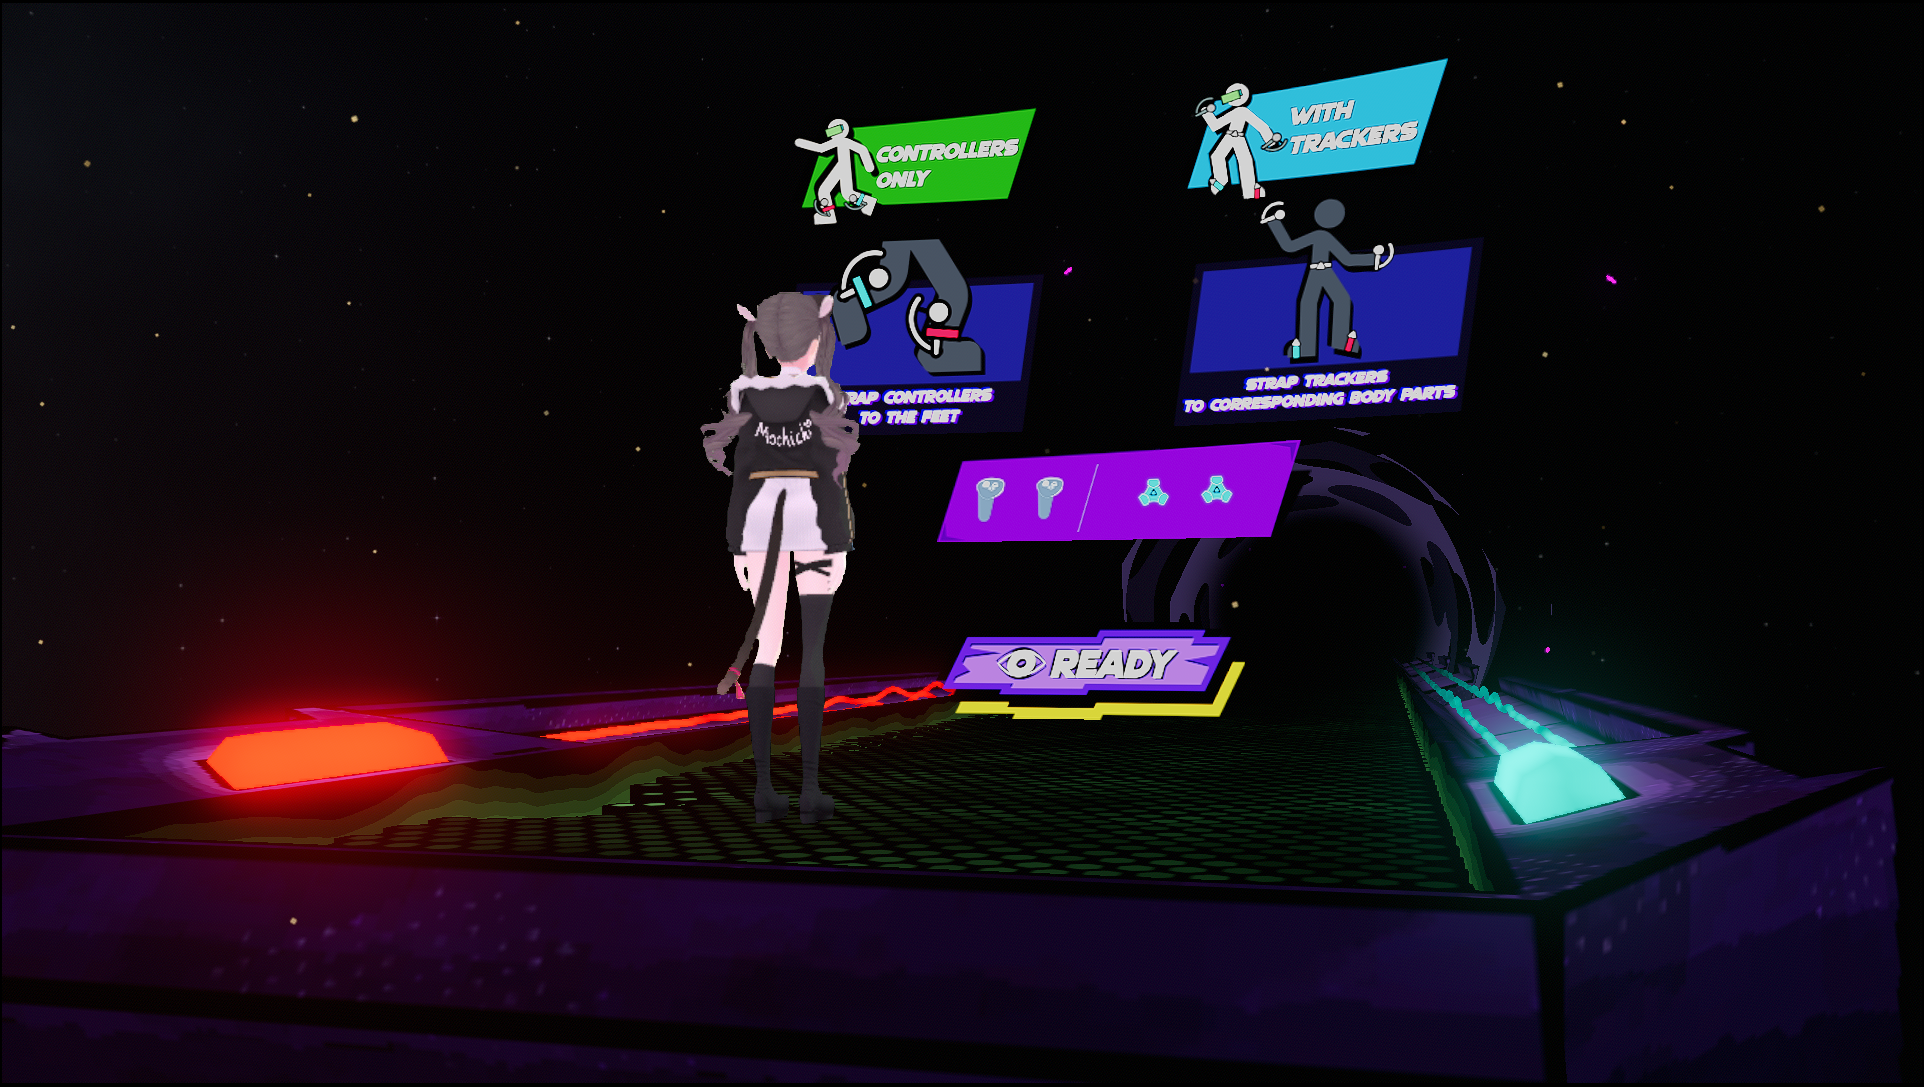
20. Capture the final output in OBS Studio.
Back in OBS Studio, go to the scene where you have your overlays and alerts set up for your stream. If you're starting from scratch, create a new scene.
Set one of your sources to be a “Game Capture”, and ensure that the window captured is “LIV Output”.
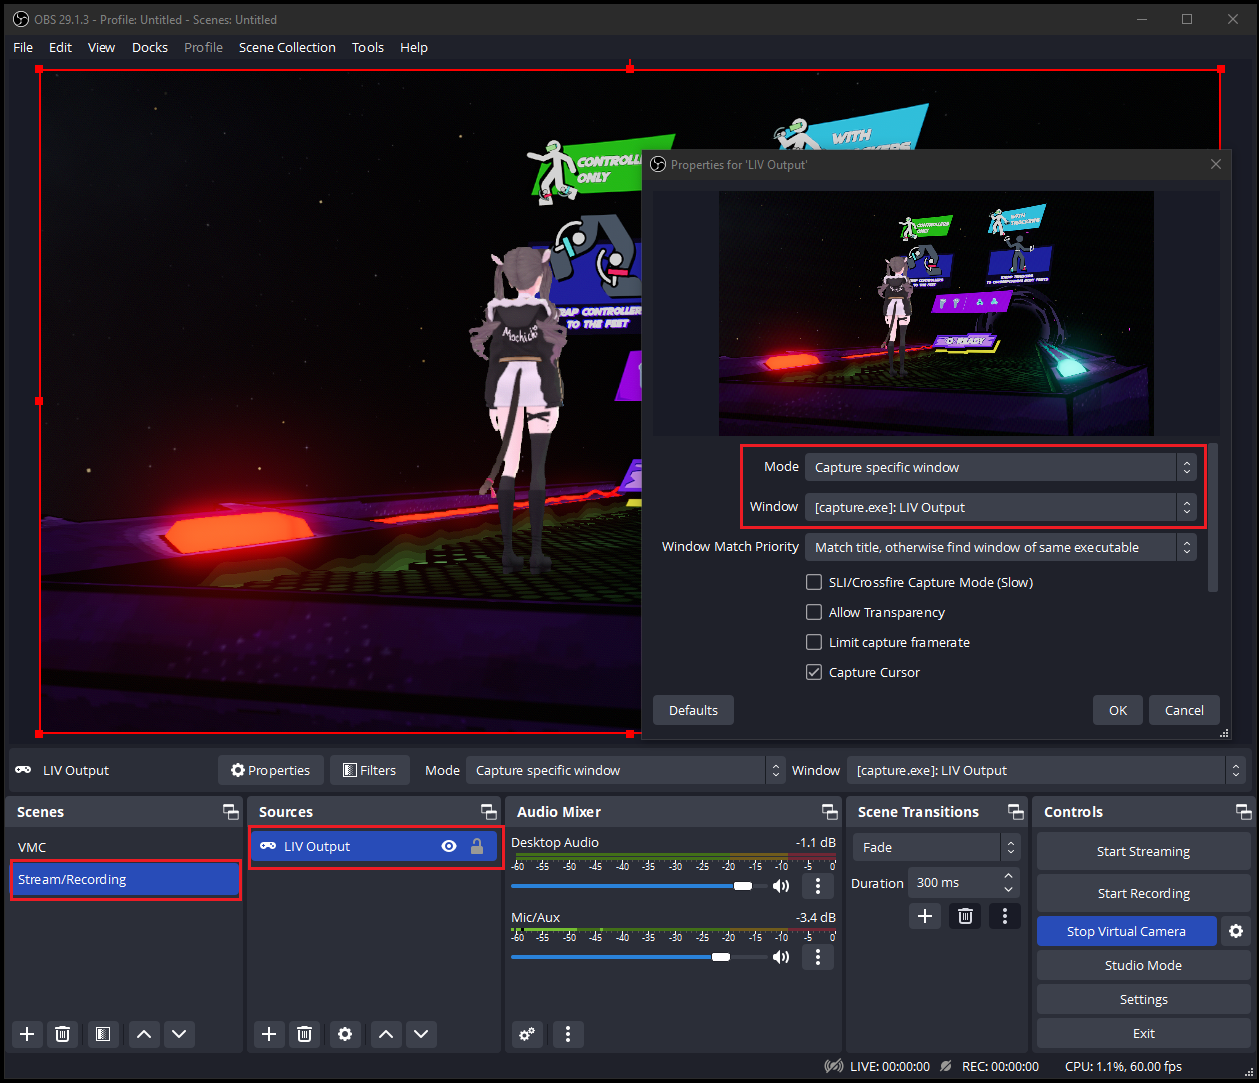
21. Calibrate yourself with your avatar
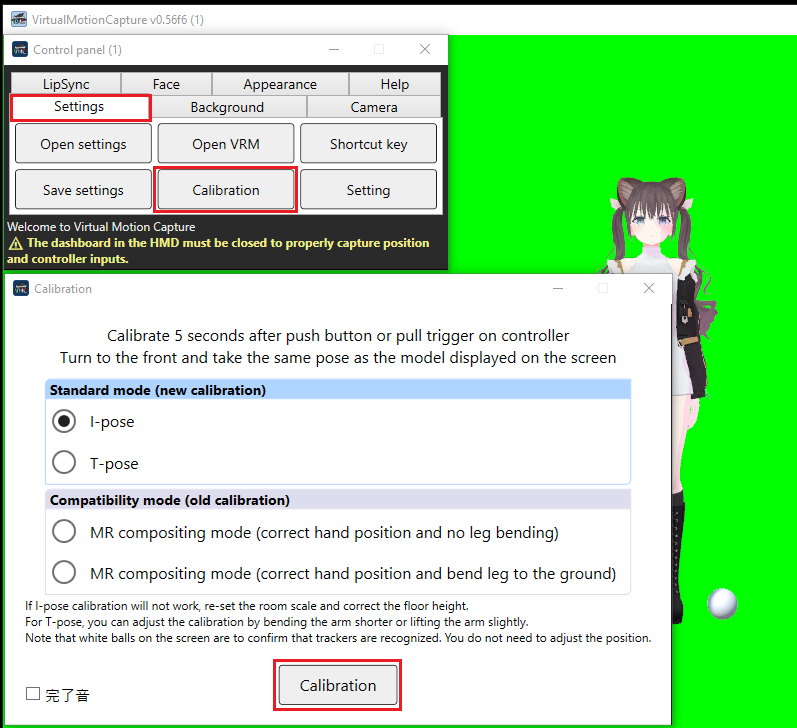
Back in VMC, click “Calibration” from the Settings tab.
Follow the instructions that pop-up on the screen (I personally like the I-pose, but either poses work), and click “Calibration” and stand still until calibration shows “Done!”
This completes the entire setup process for OBS Studio! Thank you for reading, hope it all goes well. Happy Dancing (/・ω・)/
Next time you stream/record your content, launching things in the order of “Steam VR → VMC/Calibrate → OBS Studio (Start virtual camera) → LIV/Launching game through LIV” will most likely provide the most stable results.
Note: Though Streamlabs has the virtual webcam feature, it still doesn't have enough to where we are able to use it on its own. A follow-up tutorial for setting up VMC with Streamlabs will be coming shortly.
Final Thanks:
Everything used for this set up is available to you for free.
With that said, a lot of work has gone into developing the software packages, and Akira (the dev for VMC) also has a PIXIV Fanbox account so please consider making a donation to support their work.
PixivFanbox: https://akira.fanbox.cc/
VMC Official Site: https://vmc.info/
Akira's Twitter X: https://twitter.com/sh_akira
I also can't thank Shironagaaaasu from our community enough, as I referenced her blog to set up my own.
You can find her and her amazing content below:
Twitch: https://www.twitch.tv/shrngaaas
Twitter X: https://twitter.com/shironagaaaasu
Come join me at https://www.twitch.tv/mochichi72 if you're interested in the content I produce (^^ If you have any feedback, let me know by mentioning me (@.mochichi) on the Official Dance Dash Discord!